Hello Everybody,
Today, I would like to talk about a very interesting tools called OSSEC. OSSEC detects intrusions and attempted intrusions and it's also hosed-based intrusion detection system(HIDS). OSSEC is a free software under the GNU General Public License and it's available for Linux, Windows, Solaris,HP-UX, and AIX.
OSSEC provides the following services:
1. Log analysis
2. Rootkit detection
3. File integrity checking
4. Policy monitoring
5. Real-time and time-based alerting
6. Active response
So, you can activate OSSEC on your servers and it will send you alerts or take a proper action according to a set of rules that you define and configure if something goes wrong since it monitors your servers. So, it's like a 24/7 body guard for your servers.
OSSEC has two important elements:
1. OSSEC Manager (Server)
2. OSSEC Agent (Client)
Ossec manager stores all data related to file integrity checking, logs, events, rules, and configuration options for entire network. The OSSEC manager connects to OSSEC agent and get alls necessary information regardless of its operation system. And, of course, all communications between servers and agents is encrypted and secure. You need to create a key for each agent on the server. I explained it below.
OSSEC Server Installation
Unfortunately, you can't install OSSEC from repository with yum command and it's not in repository yet. So, you will need to download the source code. Login to the computer that you want to install OSSEC Server and download the source code directly or use wget command:
wget http://ossec.net/files/ossec-hids-latest.tar.gz
Figure 1
Use tar command to decompress the file:
tar -zxvf ossec-hids-latest.tar.gz
Change directory:
cd ossec-hids-*
Run install.sh script to start OSSEC installation
./install.sh
Figure 2
Type "server" and press enter. (Figure 3)
Press Enter again to accept the default location. (Figure 3)
Figure 3
Type "y" to accept email notifications and then enter your email address. The easiest way for test purposes is that enter you local root email address if you don't have SMTP server, in this case: root@localhost.localdomain.
Enter127.0.0.1 for the ip of your smtp server.If you have smtp server,change it accordingly(Figure 4).
Enter "y" to run integrity check deamon (Figure 4).
Enter "y" to run the rootkit detection engine (Figure 4).
Enter "y" to enable enable active response (Figure 4).
Enter "y" to enbale the firewall-drop response (Figure 4).
Figure 4
The ip of white list is up to you, in this case I entered "n" (Figure 5).
Enter "y" to enable remote syslog (Figure 5).
Figure 5
Take a look to the comments before finishing installation. It's self explanatory.
(Figure 6)
As it said in the comments (Figure 7), run /var/ossec/bin/manage_agents to add agents
(Figure 7)
Select "A" to add an agent (Figure 8).
Type a unique name for the new agent, in this case: MyRemoteTestMachine (Figure 8).
Enter the ip address of ossec agent(client) (Figure 8).
And enter "y" to confirm adding agent (Figure 8). Pay attention to agent id of 001.
(Figure 8)
Now, enter "E" to generate a key for agent (Figure 9).
enter agent id, in this case 001 (Figure 9).
Copy and paste or keep the generate key. We need the key later to import it in ossec agent.
(Figure 9)
OSSEC Agent installation (Client)
Same as server, download, extract, and run installation script in the client computer (Figure 10).
This time, select "Agent" and accept the default path for installation (Figure 10).
Enter the ip of OSSEC server (Figure 10).
Figure 10
Enter "y" for running integrity check deamon, rootkit detection engine, and avtive response (Figure 11)
Figure 11
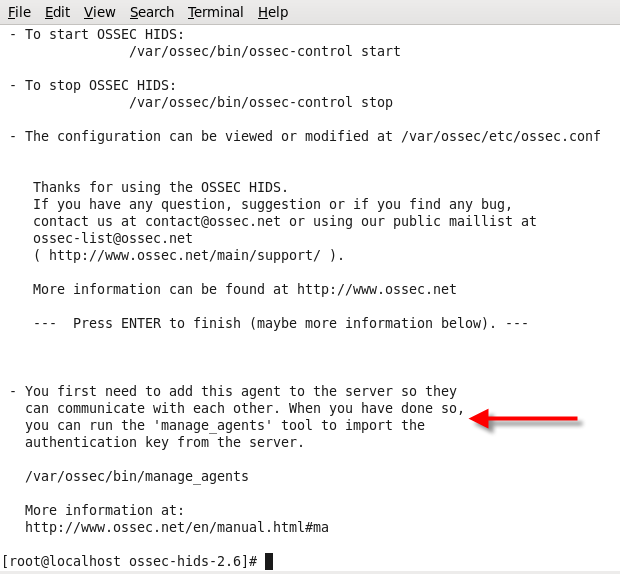
Take a look at comments now (Figure 12).
Figure 12
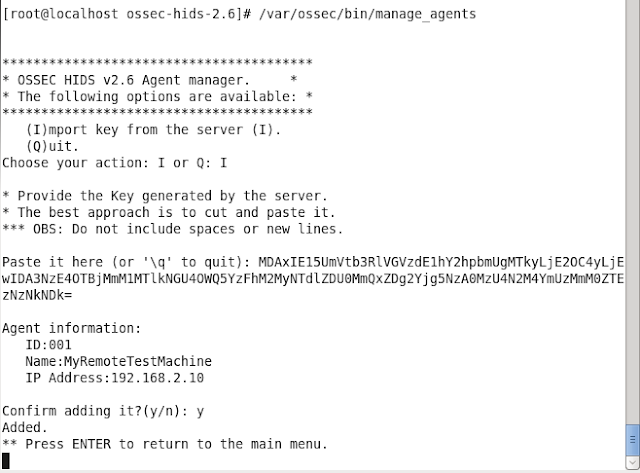
Run /var/ossec/bin/manage_agents to import the key (Figure 13).
select "I" and paste the key here. Then confirm it (Figure 13).
Open port 1514 (UDP) if there is a firewall between the server and the agents (not applicable to the local installation type)
iptables -I INPUT -p udp --dport 1514 -j ACCEPT
After you have made this changes, restart the OSSEC agent and OSSEC server:
/var/ossec/bin/ossec-control restart
Testing OSSEC
In order to test our configured OSSEC, try to login to root with incorrect password in the client (Figure 14)
(Figure 14)
Now, go to OSSEC server and login in as root. Then open your emails with mail command (Figure 15)
(Figure 15)
Open your email and see notification (Figure 16)
(Figure 16)
The majority of the configuration is stored on the server in the /var/ossec/etc/ossec.conf file.
Conclusion
OSSEC is a host-based intrusion detection system (HIDS). OSSEC is free software and is available as source code under the GNU General Public License. OSSEC runs on the systems of interest and monitors their activity. It can send alerts or take action according to a set of rules that you configure.
Hope you enjoyed.
Khosro Taraghi


