Hello Everybody,
Today, I would like to talk about a very interesting tools called OSSEC. OSSEC detects intrusions and attempted intrusions and it's also hosed-based intrusion detection system(HIDS). OSSEC is a free software under the GNU General Public License and it's available for Linux, Windows, Solaris,HP-UX, and AIX.
OSSEC provides the following services:
1. Log analysis
2. Rootkit detection
3. File integrity checking
4. Policy monitoring
5. Real-time and time-based alerting
6. Active response
So, you can activate OSSEC on your servers and it will send you alerts or take a proper action according to a set of rules that you define and configure if something goes wrong since it monitors your servers. So, it's like a 24/7 body guard for your servers.
OSSEC has two important elements:
1. OSSEC Manager (Server)
2. OSSEC Agent (Client)
Ossec manager stores all data related to file integrity checking, logs, events, rules, and configuration options for entire network. The OSSEC manager connects to OSSEC agent and get alls necessary information regardless of its operation system. And, of course, all communications between servers and agents is encrypted and secure. You need to create a key for each agent on the server. I explained it below.
OSSEC Server Installation
Unfortunately, you can't install OSSEC from repository with yum command and it's not in repository yet. So, you will need to download the source code. Login to the computer that you want to install OSSEC Server and download the source code directly or use wget command:
wget http://ossec.net/files/ossec-hids-latest.tar.gz
Figure 1
Use tar command to decompress the file:
tar -zxvf ossec-hids-latest.tar.gz
Change directory:
cd ossec-hids-*
Run install.sh script to start OSSEC installation
./install.sh
Figure 2
Type "server" and press enter. (Figure 3)
Press Enter again to accept the default location. (Figure 3)
Figure 3
Type "y" to accept email notifications and then enter your email address. The easiest way for test purposes is that enter you local root email address if you don't have SMTP server, in this case: root@localhost.localdomain.
Enter127.0.0.1 for the ip of your smtp server.If you have smtp server,change it accordingly(Figure 4).
Enter "y" to run integrity check deamon (Figure 4).
Enter "y" to run the rootkit detection engine (Figure 4).
Enter "y" to enable enable active response (Figure 4).
Enter "y" to enbale the firewall-drop response (Figure 4).
Figure 4
The ip of white list is up to you, in this case I entered "n" (Figure 5).
Enter "y" to enable remote syslog (Figure 5).
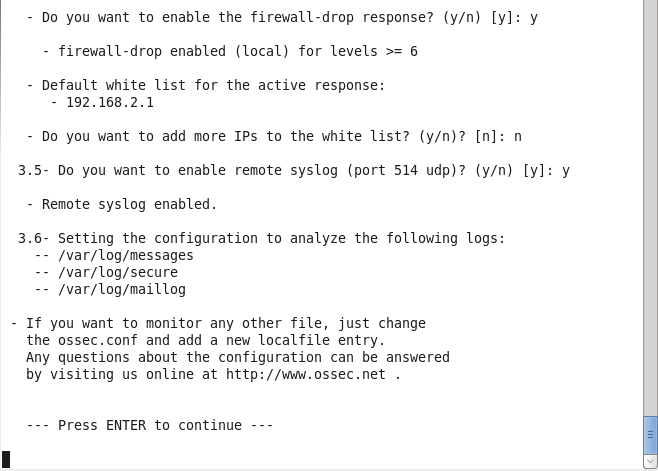
Figure 5
Take a look to the comments before finishing installation. It's self explanatory.
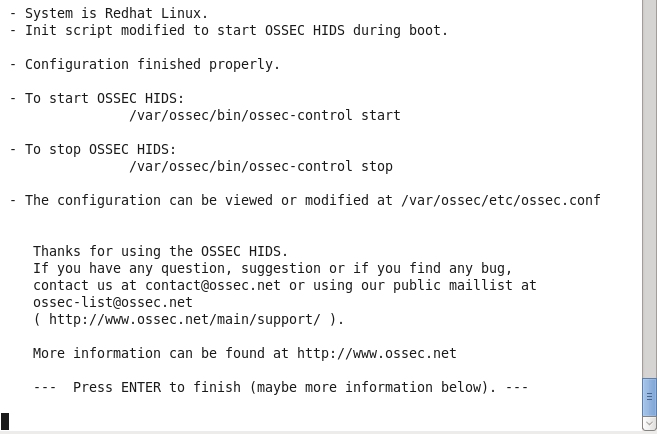
(Figure 6)
As it said in the comments (Figure 7), run /var/ossec/bin/manage_agents to add agents
(Figure 7)
Select "A" to add an agent (Figure 8).
Type a unique name for the new agent, in this case: MyRemoteTestMachine (Figure 8).
Enter the ip address of ossec agent(client) (Figure 8).
And enter "y" to confirm adding agent (Figure 8). Pay attention to agent id of 001.
(Figure 8)
Now, enter "E" to generate a key for agent (Figure 9).
enter agent id, in this case 001 (Figure 9).
Copy and paste or keep the generate key. We need the key later to import it in ossec agent.
(Figure 9)
OSSEC Agent installation (Client)
Same as server, download, extract, and run installation script in the client computer (Figure 10).
This time, select "Agent" and accept the default path for installation (Figure 10).
Enter the ip of OSSEC server (Figure 10).
Figure 10
Enter "y" for running integrity check deamon, rootkit detection engine, and avtive response (Figure 11)
Figure 11
Take a look at comments now (Figure 12).
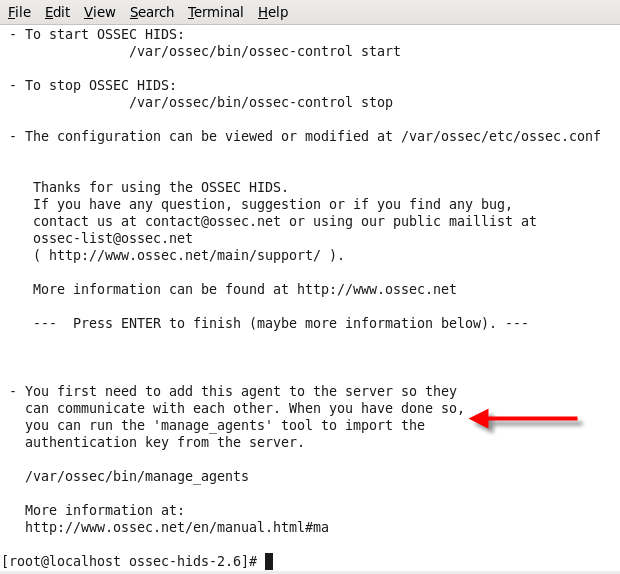
Figure 12
Run /var/ossec/bin/manage_agents to import the key (Figure 13).
select "I" and paste the key here. Then confirm it (Figure 13).
Open port 1514 (UDP) if there is a firewall between the server and the agents (not applicable to the local installation type)
iptables -I INPUT -p udp --dport 1514 -j ACCEPT
After you have made this changes, restart the OSSEC agent and OSSEC server:
/var/ossec/bin/ossec-control restart
Testing OSSEC
In order to test our configured OSSEC, try to login to root with incorrect password in the client (Figure 14)
(Figure 14)
Now, go to OSSEC server and login in as root. Then open your emails with mail command (Figure 15)
(Figure 15)
Open your email and see notification (Figure 16)
(Figure 16)
The majority of the configuration is stored on the server in the /var/ossec/etc/ossec.conf file.
Conclusion
OSSEC is a host-based intrusion detection system (HIDS). OSSEC is free software and is available as source code under the GNU General Public License. OSSEC runs on the systems of interest and monitors their activity. It can send alerts or take action according to a set of rules that you configure.
Hope you enjoyed.
Khosro Taraghi
Tuesday, February 26, 2013
Tuesday, January 29, 2013
The Samba Web Administration Tool (SWAT)
Hello everybody,
Today, I would like to talk about a very interesting tools for Samba. It's called The Samba Web Administration Tool (SWAT). Redhat families no longer use GUI tools for configuring Samba. Instead, they use a web-based administration tools for this purpose. It's really easy to use and it's fully funcational with sufficient help pages.
In order to install Samba server, Samba client, and SWAT, you need to install the following
packages:
yum install samba samba-client samba-common samba-doc samba-domainjoin-gui samba-swat
To activate SWAT, you need to start/restart xinetd service. Also, you can use chkconfig command to enable SWAT after rebooting machine:
chkconfig swat on
service xinetd start
service xinetd restart ---> if it already started
Then, you can access the SWAT by using the following url in local machine:
http://localhost:901
For sure, you can access SWAT from a remote location, but you need to open port 901 in firewall by following command:
iptables -I INPUT -p tcp --dport 901 -j ACCEPT
Also, you must change the
only_from = 127.0.0.1
line in the /etc/xinetd.d/swat file to
only_from = ip-address-of-remote-machine
which is 192.168.2.6 in my case. Please adjust your ip address accordingly.
Figure 1
Then restart xinetd: service xinetd restart
In browser, when you connect to swat, it will ask you for username and password. Enter the root user account and its password, then you will see the SWAT homepage:
Figure 2
In Homepage, you can find a very good Samba documentation.
In Global, by clicking GLOBALS icon on top Menu, you can change the global setting in the smb.conf configuration file. For example,
workgroup = MYGROUP --> It’s set to the default workgroup for Microsoft Windows 7. If you are using workgroup in your network, you can adjust it accordingly.
or
netbios name = LOCALHOST -->It can be the same hostname used for the system. This becomes what other clients see in network browse lists such as those shown from a Microsoft net view command or a regular Linux smbclient command.
You can always switch between Basic and Advance view of configurations. Advance view gives you sufficient details:
Figure 3
I am not going to explain every single line in this tools since it's a lot and beyond of this discussion. I assumed that you know the Samba configuration and this topic is just to introduce SWAT. Nevertheless, I will show you how to share a folder in Samba with this tools.Also, there is always a link (Help) beside each option that gives you a lot of information.
Note: when you change something in options, you must click on Commit Changes button to save your changes.
Note: You must open firewall for samba server. To do this, enter the following command:
iptables -I INPUT -p tcp --dport 139 -j ACCEPT
iptables -I INPUT -p tcp --dport 445 -j ACCEPT
iptables -I INPUT -p udp --dport 137 -j ACCEPT
iptables -I INPUT -p udp --dport 138 -j ACCEPT
Now, I am going to show you how to create a share folder in Samba server to be accessible by all Linux and Windows clients by using SWAT.
Make a directory that you want to share and put some dummy files in Samba server.
mkdir /home/khosro/Samba-Test
touch /home/khosro/Samba-Test/test.txt
In GLOBALS, change netbios name to whatever you want. In this case, KHOSROHOST. This becomes what other clients see in network browse lists.
In SHARES, enter the path to the directory that you made above. In this case: /home/khosro/Samba-Test and then click on Create Share button.
Figure 4
Next, select the created share path in drop down menu and press Choose Share button. It will open the Basic Options view for share folder.
Figure 5
Next, I just put my comment in Comment, my username(khosro) as valid users, change Read Only to No and Available to Yes. Then click Commit Changes.
Now, click STATUS icon on top menu and start smbd service:
Figure 6
Next, create a samba user either by clicking PASSWORD icon or through terminal in samba server:
smbpasswd -a khosro
Click on VIEW icon to see your configurations:
Figure 8
Now, open My Computer in Windows client and enter the samba server's ip address:
in this case: \\192.168.2.2
It prompts you for username and password. Enter your samba username and password that you created in previous step:
Figure 9
After entering username and password, it shows you all shares:
Figure 10
Now, if you click on share folder, you will see the following error:
Figure 11
Because of SELinux setting, you see this error. Don't panic. You can solve this error by following command in samba server:
chcon -t samba_share_t /home/khosro
chcon -R -t samba_share_t /home/khosro/Samba-Test
In addition, to make sure the changes survive a relabel of SELinux, you’ll want to set up the file_contexts.local file in the /etc/selinux/targeted/contexts/files directory with a command such as the following:
semanage fcontext -a -t samba_share_t /home/khosro/Samba-Test
semanage fcontext -a -t samba_share_t /home/khosro
Now, you are able to go to only /home/khosro/Samba-Test directory as a share folder and you don't have access to other folders under /home/khosro
Today, I would like to talk about a very interesting tools for Samba. It's called The Samba Web Administration Tool (SWAT). Redhat families no longer use GUI tools for configuring Samba. Instead, they use a web-based administration tools for this purpose. It's really easy to use and it's fully funcational with sufficient help pages.
In order to install Samba server, Samba client, and SWAT, you need to install the following
packages:
yum install samba samba-client samba-common samba-doc samba-domainjoin-gui samba-swat
To activate SWAT, you need to start/restart xinetd service. Also, you can use chkconfig command to enable SWAT after rebooting machine:
chkconfig swat on
service xinetd start
service xinetd restart ---> if it already started
Then, you can access the SWAT by using the following url in local machine:
http://localhost:901
For sure, you can access SWAT from a remote location, but you need to open port 901 in firewall by following command:
iptables -I INPUT -p tcp --dport 901 -j ACCEPT
Also, you must change the
only_from = 127.0.0.1
line in the /etc/xinetd.d/swat file to
only_from = ip-address-of-remote-machine
which is 192.168.2.6 in my case. Please adjust your ip address accordingly.
Figure 1
Then restart xinetd: service xinetd restart
In browser, when you connect to swat, it will ask you for username and password. Enter the root user account and its password, then you will see the SWAT homepage:
Figure 2
In Homepage, you can find a very good Samba documentation.
In Global, by clicking GLOBALS icon on top Menu, you can change the global setting in the smb.conf configuration file. For example,
workgroup = MYGROUP --> It’s set to the default workgroup for Microsoft Windows 7. If you are using workgroup in your network, you can adjust it accordingly.
or
netbios name = LOCALHOST -->It can be the same hostname used for the system. This becomes what other clients see in network browse lists such as those shown from a Microsoft net view command or a regular Linux smbclient command.
You can always switch between Basic and Advance view of configurations. Advance view gives you sufficient details:
Figure 3
I am not going to explain every single line in this tools since it's a lot and beyond of this discussion. I assumed that you know the Samba configuration and this topic is just to introduce SWAT. Nevertheless, I will show you how to share a folder in Samba with this tools.Also, there is always a link (Help) beside each option that gives you a lot of information.
Note: when you change something in options, you must click on Commit Changes button to save your changes.
Note: You must open firewall for samba server. To do this, enter the following command:
iptables -I INPUT -p tcp --dport 139 -j ACCEPT
iptables -I INPUT -p tcp --dport 445 -j ACCEPT
iptables -I INPUT -p udp --dport 137 -j ACCEPT
iptables -I INPUT -p udp --dport 138 -j ACCEPT
Now, I am going to show you how to create a share folder in Samba server to be accessible by all Linux and Windows clients by using SWAT.
Make a directory that you want to share and put some dummy files in Samba server.
mkdir /home/khosro/Samba-Test
touch /home/khosro/Samba-Test/test.txt
In GLOBALS, change netbios name to whatever you want. In this case, KHOSROHOST. This becomes what other clients see in network browse lists.
In SHARES, enter the path to the directory that you made above. In this case: /home/khosro/Samba-Test and then click on Create Share button.
Figure 4
Next, select the created share path in drop down menu and press Choose Share button. It will open the Basic Options view for share folder.
Next, I just put my comment in Comment, my username(khosro) as valid users, change Read Only to No and Available to Yes. Then click Commit Changes.
Now, click STATUS icon on top menu and start smbd service:
Figure 6
Next, create a samba user either by clicking PASSWORD icon or through terminal in samba server:
smbpasswd -a khosro
Figure 7
Figure 8
Now, open My Computer in Windows client and enter the samba server's ip address:
in this case: \\192.168.2.2
It prompts you for username and password. Enter your samba username and password that you created in previous step:
Figure 9
After entering username and password, it shows you all shares:
Figure 10
Now, if you click on share folder, you will see the following error:
Figure 11
Because of SELinux setting, you see this error. Don't panic. You can solve this error by following command in samba server:
chcon -t samba_share_t /home/khosro
chcon -R -t samba_share_t /home/khosro/Samba-Test
In addition, to make sure the changes survive a relabel of SELinux, you’ll want to set up the file_contexts.local file in the /etc/selinux/targeted/contexts/files directory with a command such as the following:
semanage fcontext -a -t samba_share_t /home/khosro/Samba-Test
semanage fcontext -a -t samba_share_t /home/khosro
Now, you are able to go to only /home/khosro/Samba-Test directory as a share folder and you don't have access to other folders under /home/khosro
Figure 12
By clicking the Server Status icon, you would see the current server status:
Figure 13
And that's all. Hope you enjoyed.
Khosro Taraghi
Khosro Taraghi
Sunday, December 23, 2012
What Is TCP Wrappers And How To Configure It
Hello everybody,
TCP Wrappers protects Linux services, and of course, protects those services that communicate using the TCP protocol. It's really useful and very important because it gives you an extra layer of protection, especially for those services, such as vsFTP, that you can NOT limit access by IP address in the main configuration file; you can limit access by user and chroot jail in configuration file of vsFTP, but you should use TCP Wrappers to limit access by IP address.
First, you should install the service that you want to use or make sure the service has been installed. For example, the following command will return all ssh packages that already installed
rpm -qa | grep ssh
Second, the word associated with TCP Wrappers is "hosts_access". So, you can use the "strings" command to look for "hosts_access" string in all binary files of services. Here is a script that I created to help you to find those services that support TCP Wrappers (Figure 1):
Figure 1
Now, the associated library wrapper file linked to services is libwrap.so.0. So, you can use the ldd command to list the libraries used by the services, and of course, you can filter out the output by grep command (Figure 2):
Figure 2
In this case, I used sshd service. After running the above command, I was sure that TCP Wrappers support sshd.
The configuration files for TCP Wrappers are /etc/hosts.allow and /etc/hosts.deny. So, users and clients listed in hosts.allow have access to desired service and users and clients listed in hosts.deny have not access to desired service. And here is the order of precedence:
daemon_list : client_list [ : shell command ]
ALL : ALL ---> This line in "hosts.allow" file means grant access for all services to everybody
sshd : 10.0.0.153 ---> This line in hosts.deny file means deny access for sshd service to just 10.0.0.153 ip address(figure 3)
Obviously, if this line exists in both file, the mentioned ip address will be granted because hosts.allow has precedence to hosts.deny
ALL : .khosro.com ---> (.) means all hosts with the specified domain name or IP network address. In this case, access to all hosts on the khosro.com domain for all services if it's in the hosts.allow
sshd : 10.0.0.0/255.255.255.0 EXCEPT 10.0.0.153 ---> You can specify IP network address with subnet mask and CIDR notation is NOT allowed, like 10.0.0.0/24. You can make an exception with EXCEPT operator. In this case, all IPs in 10.0.0.0/255.255.255.0 network have not access to sshd except 10.0.0.153 if this line exist in hosts.deny file.
sshd, xinetd : 10.0.0.153 ---> You can setup multiple services and addresses with commas.
sshd : user1@khosro.linux.com ---> Grant access to the specific user if this line exists in the hosts.allow
Figures 3 to 5 show some good examples of TCP Wrappers with shell command:
Server A:
Figure 3
Server B:
Figure 4
Server A:
Figure 5
"mail -s %d-%h root" is the command that send information to root user. The following expansions are available within shell commands:
%a (%A) The client (server) host address.
%c Client information: user@host, user@address, a host name, or just an address, depending on how much information is available.
%d The daemon process name.
%h (%H) The client (server) host name or address, if the host name is unavailable.
%n (%N) The client (server) host name (or "unknown" or "paranoid").
%p The daemon process id.
%s Server information: daemon@host, daemon@address, or just a daemon name, depending on how much information is available.
%u The client user name (or "unknown").
%% Expands to a single ‘%´ character.
Characters in % expansions that may confuse the shell are replaced by underscores.
The safe_finger command comes with the tcpd wrapper. It limits possible damage from data sent
by the remote finger server. It gives better protection than the standard finger command.
And that's all.
Hope you enjoyed.
Khosro Taraghi
TCP Wrappers protects Linux services, and of course, protects those services that communicate using the TCP protocol. It's really useful and very important because it gives you an extra layer of protection, especially for those services, such as vsFTP, that you can NOT limit access by IP address in the main configuration file; you can limit access by user and chroot jail in configuration file of vsFTP, but you should use TCP Wrappers to limit access by IP address.
How Do You Find a Service Is Protected by TCP Wrappers:
First, you should install the service that you want to use or make sure the service has been installed. For example, the following command will return all ssh packages that already installed
rpm -qa | grep ssh
Second, the word associated with TCP Wrappers is "hosts_access". So, you can use the "strings" command to look for "hosts_access" string in all binary files of services. Here is a script that I created to help you to find those services that support TCP Wrappers (Figure 1):
Figure 1
Now, the associated library wrapper file linked to services is libwrap.so.0. So, you can use the ldd command to list the libraries used by the services, and of course, you can filter out the output by grep command (Figure 2):
Figure 2
In this case, I used sshd service. After running the above command, I was sure that TCP Wrappers support sshd.
Configure TCP Wrappers
The configuration files for TCP Wrappers are /etc/hosts.allow and /etc/hosts.deny. So, users and clients listed in hosts.allow have access to desired service and users and clients listed in hosts.deny have not access to desired service. And here is the order of precedence:
- First, it goes through the /etc/hosts.allow file. If it finds any match, it gives access and does NO more action or search.
- If it doesn't match anything in /etc/hosts.allow, it goes through /etc/hosts.deny file. If it finds any match, it will deny access.
- If it doesn't find any match in both hosts.allow and hosts.deny files, it gives access to the client by default.
daemon_list : client_list [ : shell command ]
- daemon list is a list of one or more daemon process names, such as sshd or xinetd.
- client list is a list of one or more host names, host addresses, patterns or wildcard that will be match against the client host name or address.
- Shell Command is optional and can run a shell command if it matches any.
ALL : ALL ---> This line in "hosts.allow" file means grant access for all services to everybody
sshd : 10.0.0.153 ---> This line in hosts.deny file means deny access for sshd service to just 10.0.0.153 ip address(figure 3)
Obviously, if this line exists in both file, the mentioned ip address will be granted because hosts.allow has precedence to hosts.deny
ALL : .khosro.com ---> (.) means all hosts with the specified domain name or IP network address. In this case, access to all hosts on the khosro.com domain for all services if it's in the hosts.allow
sshd : 10.0.0.0/255.255.255.0 EXCEPT 10.0.0.153 ---> You can specify IP network address with subnet mask and CIDR notation is NOT allowed, like 10.0.0.0/24. You can make an exception with EXCEPT operator. In this case, all IPs in 10.0.0.0/255.255.255.0 network have not access to sshd except 10.0.0.153 if this line exist in hosts.deny file.
sshd, xinetd : 10.0.0.153 ---> You can setup multiple services and addresses with commas.
sshd : user1@khosro.linux.com ---> Grant access to the specific user if this line exists in the hosts.allow
Figures 3 to 5 show some good examples of TCP Wrappers with shell command:
Server A:
Figure 3
Server B:
Figure 4
Server A:
Figure 5
"mail -s %d-%h root" is the command that send information to root user. The following expansions are available within shell commands:
%a (%A) The client (server) host address.
%c Client information: user@host, user@address, a host name, or just an address, depending on how much information is available.
%d The daemon process name.
%h (%H) The client (server) host name or address, if the host name is unavailable.
%n (%N) The client (server) host name (or "unknown" or "paranoid").
%p The daemon process id.
%s Server information: daemon@host, daemon@address, or just a daemon name, depending on how much information is available.
%u The client user name (or "unknown").
%% Expands to a single ‘%´ character.
Characters in % expansions that may confuse the shell are replaced by underscores.
The safe_finger command comes with the tcpd wrapper. It limits possible damage from data sent
by the remote finger server. It gives better protection than the standard finger command.
And that's all.
Hope you enjoyed.
Khosro Taraghi
Wednesday, November 14, 2012
Volume Encryption with the Linux Unified Key Setup (LUKS)
Hello everybody,
LUKS is a way to encrypt devices on a system. Keep in mind that LUKS works on a block level and it applies to block devices files such as partitions and Logical Volumes(LVs) associated with storage. So, it encrypts your partitions and your data is secure in case that you lost your computer because the LUKS-protected partition requires either passphrase or a key file.
During installation of Linux, you have an opportunity to encrypt your partitions or volumes which could be the easiest way to encrypt the partitions; however, the following description is related to encryption of a partition or volume after installation of RedHat, CentOS, Fedora, or SELinux and also how to create, configure, mount, and unmount LUKS-encrypted filesystems.
To install cryptsetup-luks RPM package, run the following command:
yum install cryptsetup-luks
In order to work with LUKS and encryption, you need to load dm_crypt module if it's not loaded already. Try the following command first:
lsmod | grep dm_crypt
and it should return something like this:
Figure 1
If you don't see any output, you can load the module with following command:
modprobe dm_crypt
Now, if you run "lsmod | grep dm_crypt" command again, you will see the output.
Before creating an encrypted filesystem, we need a partition. Now, I am going to create a partition on /dev/sdb with fdisk command (that's a regular partition from existing empty space on my second hard drive):
Figure 2
If you want to create a more secure filesystem, fill it with random data. You can use the badblocks command to do this:
badblocks -c 20480 -s -w -t random -v /dev/sdb2
which -c is the number of blocks at a time, in this case 20480, -s shows the progress of the command, -w writes data, -t writes data in a random pattern, and -v is verbose mode.
Figure 3
Also, you can use an alternative way to do this by using Linux random number generator device:
dd if=/dev/urandom of=/dev/sdb2
This command starts by filling random data, block by block, on the /dev/sdb2 device.
cryptsetup is the command that creates a LUKS-based filesystem.
cryptsetup luksFormat /dev/sdb2
Figure 4
Note:
Figure 5
In order to do a map to a different device, we need UUID of encrypted device. The following command creates a UUID for /dev/sdb2:
cryptsetup luksUUID /dev/sdb2
Figure 6
Next, type the following command (I pasted the UUID that I got from pervious command here):
cryptsetup luksOpen /dev/sdb2 e8c60fe0-2a9d-4e4d-a4af-c80a8fe70726
Figure 7
An alternative way is using a name instead of UUID number of an encrypted device. For example, you can use the following command as well which has exactly the same result and even easier and more human readable:
cryptsetup luksOpen /dev/sdb2 test
Figure 8
After running the above command,the mapped device is added to the /dev/mapper directory. Let's take a look:
Figure 9
Or if you are using a name instead of UUID, you should see something like this:
Figure 10
Then, we are ready to format the device with the following command:
mkfs.ext4 /dev/mapper/test
Figure 11
We can mount the new created LUKS device to a directory now and it's ready to use:
Figure 12
Finally, you should setup /etc/fstab file to make sure that encrypted filesystem is mounted by next time that system is booted. But you need some works to do on this part:
MappingName DeviceName Password_File_Path
The third column is optional and you can store the password of encrypted volume in somewhere like /mnt/mypassword.txt, but it has security issue and you don't want to store a password file in plain text. So, it's better to remove that column and it will ask you for a password when you reboot or boot your system. So, in my system, it looks like this:
Figure 13
and when you boot or reboot your system, it will ask you for password:
Figure 14
dumpe2fs /dev/mapper/test | grep UUID
dumpe2fs prints the super blocks information for the filesystem present on device. That UUID number that we get from dumpe2fs command can then be used to represent the encrypted volume in /etc/fstab. For example, in my case, it would be:
Figure 15
Note:
If you use the UUID of original partition, you will get the following error or something like that after reboot:
Figure 16
If you see such an error, run the following commands:
mount / -o remount,rw
vi /etc/fstab
and then remove that UUID from fstab and save it. And reboot system.
Alternatively, you can use the mapper name in fstab. For example,in my case, adding the following line in /etc/fstab works exactly in the same way as above in Figure 15 (I mean the same result).
/dev/mapper/test /test-luks ext4 defaults 1 2
So, the followings are two ways such a volume could be configured in the /etc/fstab file:
UUID=8cd80c73-8140-4006-9d22-ba4da3e29e83 /test-luks ext4 defaults 1 2
OR
/dev/mapper/test /test-luks ext4 defaults 1 2
Now, if you reboot you system, you encrypted partition will mount automatically.
And that's all. Hope you enjoyed.
Khosro Taraghi
LUKS is a way to encrypt devices on a system. Keep in mind that LUKS works on a block level and it applies to block devices files such as partitions and Logical Volumes(LVs) associated with storage. So, it encrypts your partitions and your data is secure in case that you lost your computer because the LUKS-protected partition requires either passphrase or a key file.
During installation of Linux, you have an opportunity to encrypt your partitions or volumes which could be the easiest way to encrypt the partitions; however, the following description is related to encryption of a partition or volume after installation of RedHat, CentOS, Fedora, or SELinux and also how to create, configure, mount, and unmount LUKS-encrypted filesystems.
Prepare Encryption
To install cryptsetup-luks RPM package, run the following command:
yum install cryptsetup-luks
In order to work with LUKS and encryption, you need to load dm_crypt module if it's not loaded already. Try the following command first:
lsmod | grep dm_crypt
and it should return something like this:
Figure 1
If you don't see any output, you can load the module with following command:
modprobe dm_crypt
Now, if you run "lsmod | grep dm_crypt" command again, you will see the output.
Before creating an encrypted filesystem, we need a partition. Now, I am going to create a partition on /dev/sdb with fdisk command (that's a regular partition from existing empty space on my second hard drive):
Figure 2
Prepare the New Filesystem
If you want to create a more secure filesystem, fill it with random data. You can use the badblocks command to do this:
badblocks -c 20480 -s -w -t random -v /dev/sdb2
which -c is the number of blocks at a time, in this case 20480, -s shows the progress of the command, -w writes data, -t writes data in a random pattern, and -v is verbose mode.
Figure 3
Also, you can use an alternative way to do this by using Linux random number generator device:
dd if=/dev/urandom of=/dev/sdb2
This command starts by filling random data, block by block, on the /dev/sdb2 device.
Create the New Filesystem
cryptsetup is the command that creates a LUKS-based filesystem.
cryptsetup luksFormat /dev/sdb2
Figure 4
Note:
- Don't forget uppercase F in luksFormat switch
- When it asks you to overwrite data, you must type uppercase YES, otherwise it doesn't ask you for passphrase and the volume will be encrypted
- You can include space in your passphrase
Figure 5
In order to do a map to a different device, we need UUID of encrypted device. The following command creates a UUID for /dev/sdb2:
cryptsetup luksUUID /dev/sdb2
Figure 6
Next, type the following command (I pasted the UUID that I got from pervious command here):
cryptsetup luksOpen /dev/sdb2 e8c60fe0-2a9d-4e4d-a4af-c80a8fe70726
Figure 7
An alternative way is using a name instead of UUID number of an encrypted device. For example, you can use the following command as well which has exactly the same result and even easier and more human readable:
cryptsetup luksOpen /dev/sdb2 test
Figure 8
After running the above command,the mapped device is added to the /dev/mapper directory. Let's take a look:
Figure 9Or if you are using a name instead of UUID, you should see something like this:
Figure 10
Then, we are ready to format the device with the following command:
mkfs.ext4 /dev/mapper/test
Figure 11 We can mount the new created LUKS device to a directory now and it's ready to use:
Figure 12
Finally, you should setup /etc/fstab file to make sure that encrypted filesystem is mounted by next time that system is booted. But you need some works to do on this part:
1. Setting up encrypted volumes during system boot
To access the data on this encrypted partition, you must recreate that /dev/mapper/test device with cryptsetup each time you boot. You can automated this process by setting up encrypted volumes during the boot process. This can be done easily by editing /etc/crypttab and add the following line to this file:MappingName DeviceName Password_File_Path
The third column is optional and you can store the password of encrypted volume in somewhere like /mnt/mypassword.txt, but it has security issue and you don't want to store a password file in plain text. So, it's better to remove that column and it will ask you for a password when you reboot or boot your system. So, in my system, it looks like this:
Figure 13
and when you boot or reboot your system, it will ask you for password:
Figure 14
2. Setting up /etc/fstab
Here is the tricky part if you want to use UUID in fstab. The UUID that we got from previous commands above corresponds to the original partition and is not associated with the encrypted filesystem. To get UUID of encrypted filesystem, run the following command:dumpe2fs /dev/mapper/test | grep UUID
dumpe2fs prints the super blocks information for the filesystem present on device. That UUID number that we get from dumpe2fs command can then be used to represent the encrypted volume in /etc/fstab. For example, in my case, it would be:
Figure 15
Note:
If you use the UUID of original partition, you will get the following error or something like that after reboot:
Figure 16
If you see such an error, run the following commands:
mount / -o remount,rw
vi /etc/fstab
and then remove that UUID from fstab and save it. And reboot system.
Alternatively, you can use the mapper name in fstab. For example,in my case, adding the following line in /etc/fstab works exactly in the same way as above in Figure 15 (I mean the same result).
/dev/mapper/test /test-luks ext4 defaults 1 2
So, the followings are two ways such a volume could be configured in the /etc/fstab file:
UUID=8cd80c73-8140-4006-9d22-ba4da3e29e83 /test-luks ext4 defaults 1 2
OR
/dev/mapper/test /test-luks ext4 defaults 1 2
Now, if you reboot you system, you encrypted partition will mount automatically.
And that's all. Hope you enjoyed.
Khosro Taraghi
Subscribe to:
Posts (Atom)