Tuesday, August 27, 2013

Installing PostgreSQL Database Server/Client on RedHat Linux Families (RedHat,Fedora,CentOS,SELinux)

Hello everyone,

Today, I would like to talk about a very very good open source Database Server called PostgreSQL. Recently, I've started to work with Postgresql and really love it. I would say it has all features of commercial databases such as DB2 and Oracle and even more. Some of core features are:

  1.  Object-Relational DBMS
  2.  Capable of handling complex routines and rules
  3.  Declarative SQL queries
  4.  Multi version concurrency control
  5.  Multi user support
  6.  Transactions
  7.  Query optimization
  8.  Inheritance
  9.  Arrays
  10.  Highly extensible
  11. Comprehensive SQL support (support SQL99, SQL92)
  12. Referential integrity (insure the validity of database's data)
  13. Flexible API (so many vendors such as Object Pascal, Python, Perl, PHP, ODBC, Java/JDBC, Ruby, TCL, C/C++, and Pike have deployment support for PostgreSQL RDBMS
  14. Procedural Languages (it supports internal procedural native language called PL/pgSQL, which comparable to the Oracle procedural language PL/SQL, and also it has ability to use Perl, Python, and/or TCL as an embedded procedural language)
  15. MVCC (Multi-version Concurrency Control is the technology that Posrgresql uses to avoid unnecessary locking)
  16. Server/Client
  17. Write Ahead Logging (WAL), ability to write the changes to log file before writing to database.(In case of unlikely crash, there will be a record of transaction to restore)

Installing PostgreSQL


The following shows how to install PostgreSQL from source code. Although you could install PostgreSQL server and client easily with yum command (yum install postgresql-server postgresql-client), I would recommend to install from source code because it is so flexible to adding/removing features and to customize it even after compiling source code. For example, you can add more features to Postgresql by reconfiguring and compiling the source code again without losing your data and databases.

1. Installing the required/optional packages:

yum install gcc make kernel-devel perl-ExtUtils-MakeMaker perl-ExtUtils-Embed readline-devel zlib-devel openssl-devel pam-devel libxml2-devel openldap-devel tcl-devel python-devel flex bison

2. Download the source code from command line: (PostgreSQL-9.2.4 is the current stable version at the time of writing this)

wget http://ftp.postgresql.org/pub/source/v9.2.4/postgresql-9.2.4.tar.gz

3. Creating the "postgres" user:
It is always a good idea to create a PostgreSQL superuser to own and manage the PostgreSQL database files rather than using "root" account as the PostgreSQL superuser because of security purposes. This user can be named anything and I named it "posrgres":

su -     --> switch to root account 
useradd postgres  --> create user
passwd postgres   --> set password

                                                                     Figure 1

4. Move and unpack the Postgresql source package:

cp postgresql-9.2.4.tar.gz /usr/local/src/
cd /usr/local/src/
tar -xzvf postgresql-9.2.4.tar.gz


5. Grant the ownership of the Postgresql source directory to "postgres" user. It enables you to compile PostgreSQL as the "postgres" user.

chown -R postgres.postgres postgresql-9.2.4

6. Configuring the source.Now, switch to postgresql-9.2.4 directory:

cd postgresql-9.2.4
and run
./configure --help
to see all available options to customize your PostgreSQL


                                                                             Figure 2


It's pretty self explanatory. For our purpose, I am going to use the options below and leave other options as default:

./configure --mandir=/usr/local/pgsql/man --with-tcl --with-perl --with-python --with-pam --with-ldap --with-openssl --with-libxml

which
--mandir=DIR     is       man documentation [DATAROOTDIR/man]
--with-tcl             is       build Tcl modules (PL/Tcl); if you plan to use pl/Tcl procedural language
--with-perl           is       build Perl modules (PL/Perl); if you plan to use pl/Perl procedural language
--with-python      is       build Python modules (PL/Python); if you plan to use pl/Python procedural language
--with-pam          is       build with PAM support
--with-ldap          is       build with LDAP support
--with-openssl     is       build with OpenSSL support
--with-libxml      is       build with XML support

7. Now, run the "make" command after switching to "postgres" user:

su postgres
make


After compiling source, you should see the following message:
"All of PostgreSQL successfully made. Ready to install."


                                                                               Figure 3


8. We need to do regression test. This is optional but really recommended it.

make check


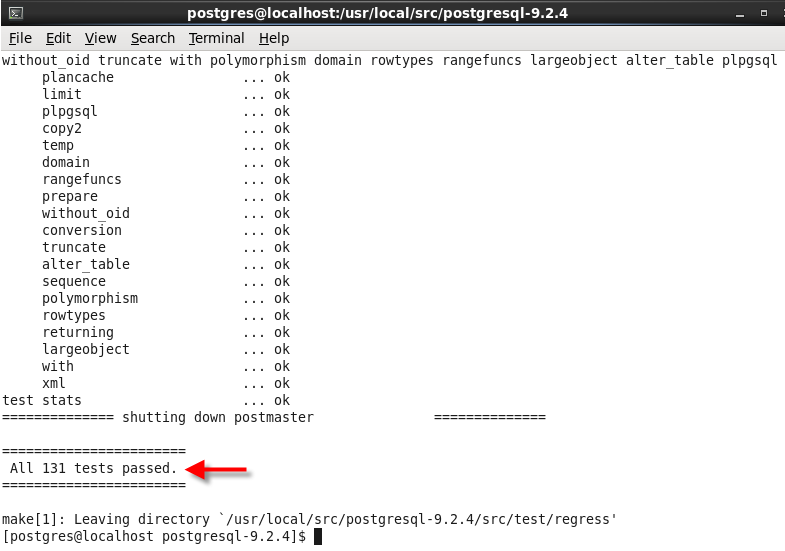
                                                                              Figure 4


                                                                              Figure 5


8. Now, you need to install compiled programs and libraries and "su -" command save your time to log in as root user for command's execution:

su -c "make install"


                                                                              Figure 6


Don't forget to change the owner of PostgreSQL installation directory, in this case /usr/local/pgsql, to "postgres" user:

su -c "chown -R postgres.postgres /usr/local/pgsql"

9. Then, install documentation:

su -c "make install-docs"


                                                                             Figure 7


10. Next, we need to set environment variables. I am going to set environment variables for man page and bin directory. In order to do that, add the following lines to the end of /etc/profile

echo 'PATH=$PATH:/usr/local/pgsql/bin' >> /etc/profile
echo 'MANPATH=$MANPATH:/usr/local/pgsql/bin' >> /etc/profile
echo 'export PATH MANPATH' >> /etc/profile


Don't forget to log out and log in again to take effect the new variables.
Now try "man psql"
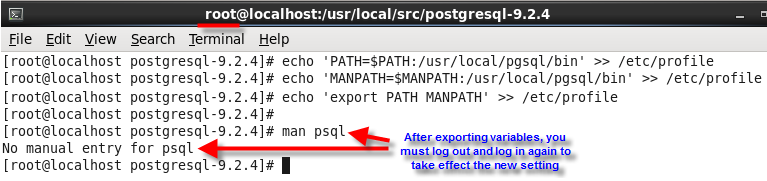

                                                                               Figure 8


11. Now, we need to initialize and start PostgreSQL. Make sure you logged in as postgres user. Then run the following command:

/usr/local/pgsql/bin/initdb -D /usr/local/pgsql/data

The path after the -D option is up to you. You can put any path BUT make sure on that path the user "postgres" has write access on it.


                                                                            Figure 9


12. To start the database server in the background, run the following command:

/usr/local/pgsql/bin/pg_ctl -D /usr/local/pgsql/data -l /tmp/logfile-pgsql.log start


to make sure that server is running, use the following commands:

cat /tmp/logfile-pgsql.log
netstat -antp


                                                                           Figure 10


13. Next, we need to configure PostgreSQL in SysV Script so that we can gracefully control PostgreSQL database though the use of SysV runlevel system. In order to do that, we need to copy a script called "linux" to init.d directory. I also renamed it to "postgresql" to be more meaningful. Run the following commands:

su -c "cp /usr/local/src/postgresql-9.2.4/contrib/start-scripts/linux /etc/rc.d/init.d/postgresql"
su -c "chmod a+x /etc/rc.d/init.d/postgresql"   
--> make the script executable

If you wish for the script to startup PostgreSQL automatically when the machine boots up, run the following command:

su -c "chkconfig --add postgresql"


                                                                            Figure 11


Now, to start and stop PostgreSQL, run the following commands:

service postgresql stop
service postgresql start


                                                                            Figure 12


14. Let's create a test database, we need it when we want to try to connect from client side(another machine) to database server:

createdb testdb
psql testdb


                                                                             Figure 13


15. In order to connect to database server through network from client side, we need to do the followings:

  1.   Insatll PostgreSQL Client with yum command in the client machine(it's different than server machine):
           yum install postgresql-client 
  2. Go back to server, and open pg_hba.conf in vi:
           vi /usr/local/pgsql/data/pg_hba.conf
         then, change this line:
           host    all             all             127.0.0.1/32            trust
         to whatever your client's ip address is. Or you can say the whole subnet. In this case:
           host    all             all             192.168.0.2/24          trust
  3. Next, open postgresql.conf in vi:
           vi /usr/local/pgsql/data/postgresql.conf
         and uncomment this line:
          #listen_addresses = 'localhost'
         and change 'localhost' to the ip address of server, in this case:
          listen_addresses = '192.168.0.1'
  4. Open the PostgreSQL server port, run the below command:
          su -c "iptables -I INPUT -m state --state NEW -m tcp -p tcp --dport 5432 -j ACCEPT"
  5.  Restart postgresql service:
          service postgresql stop
          service postgresql start
  6. Finally, try to connect to server by the following command in clinet machine:
          psql -h 192.168.0.1 -U postgres -d testdb
           which
           -h means host
           -U means user
           -d means database name


                                                                      Figure 14


And that's all. I am going to post more blog about PostgreSQL since I've been liked it so far. Hope you enjoyed.

Khosro Taraghi

Monday, July 29, 2013

Moving User's Home Directory and Its Common Errors

Hello everybody,
Today, I would like to talk about a very common error in users' home directories. Have you ever seen these errors?

Could not update ICEauthority file (Figure 1):

                                                                          Figure 1

or "There is a problem with the configuration server. (/usr/libexec/gconf-sanity-check-2 exited with status 256)" (Figure 2)

                                                                            Figure 2

or "Nautilus could not create the following required folders" (Figure 3)

                                                                               Figure 3

They are very common errors in Linux world when you move user's home directory and some users/admins, especially new users/admin in Linux, simply can't fixed it and they reinstall Linux again. However, it has a very simple solution and some users are not aware of this simple solution.


Let's start with an example:
First, login as a root and create a user:

useradd test-user

create some dummy files there by switching to this user (Figure 4):

su - test-user
touch abc ab ac abcd
pwd
exit


                                                                                Figure 4

Take a look inside the test-user's home directory (Figure 5):

ls -al /home/test-user

                                                                                 Figure 5

Now, let's move user's home directory to new location (Figure 6):

mkdir -p /new-home
tar czf - /home/test-user | (cd /new-home ; tar -xvzf -)


the above command will compress user's home directory and decompress it into new location. "-" force tar command to send its output to stdout then receive its input from stdin. 

                                                                                 Figure 6

Use ls command to make sure your files are there:

ls -al /new-home/home/test-user

Complete ownership of all files and directories (Figure 7):

chown -R test-user.test-user /new-home/home/test-user

                                                                              Figure 7

Now, let's delete test-user's old directory (Figure 8):

rm -rf /home/test-user

Now, login with test-user (Figure 8):

su - test-user

And yes, you would see the error that I was talking about:

                                                                                  
                                                                              Figure 8

 and if you try to login with GUI, you would see those errors as I showed you above.

The problem is that you moved user's home directory but you didn't update /etc/passwd file and that's why the su command complained or you saw those odd errors in GUI. You can fix it easily with usermod command. Just type the following command (Figure 9):

usermod -d /new-home/home/test-user test-user

                                                                                 Figure 9

You should be fine now.Try to login again:

su - test-user

and here you go (Figure 9). To see your present work directory, type pwd.
And that's all.
Hope you enjoyed.
Khosro Taraghi

Wednesday, June 26, 2013

What is rdist? How rdist works in Linux?

Hello all,
Today, I would like to talk about “rdist” command. “rdist” is a remote file distribution program. It is a program to maintain identical copies of files over multiple hosts. It preserves the owner,  group, mode and mtime(modification time) of files and can update programs that are executing.

To install rdist, run the following command on server and all clients that you want to be in sync with server:

yum install rdist

Also, in order to communicate and distribute the files from server to clients, you need to install/start sshd service on clients and setup ssh in such a way that does not require a password but authenticate the client with cryptographic key pair. Therefore, run the following commands on server (Figure 1):

su -
ssh- keygen –t rsa –b 1024 
(Just hit Enter for the key and both passphrases)
ssh-copy-id root@client 
(copy key to clients. Note: replace the “client” with actual hostname of your clients. For example, MyTestMachine.localdomain).  And of course, you have to have a DNS to convert the hostname to IP address or simply define it in /etc/hosts.
Repeat this step for each client.

On clients, run the following commands:
service sshd start
chkconfig sshd on


                                                                    Figure 1

Now, let’s look at how it actually works. rdist looks for a control file called “Distfile" or “distfile” in current directory. If it’s not in current directory, you can explicitly specifies the control file’s name by –f flag, something like this:  rdist –f distfile

Inside “distfile” file, first you need to define the list of files that you want to distribute them on clients. For example,
SYSTEM_FILES = (/etc/group /root/test.txt)           --> separate files with one space
Then, list the clients (their host name):
HOSTS = (machine1.localdomain machine2.localdomain machine3.localdomain)

Now, define statements. The form of statement looks like this:
Label: pathnames -> destinations commands

So, the Label can be any name. The point of using Label is that you can run “rdist label” command to  distribute only the files described in a particular statement.

The pathnames and destinations are lists of files to be copied and hosts to copy them to, respectively. For instance,
All_clients: ${SYSTEM_FILES} -> ${HOSTS}
means copy /etc/group and /root/test.txt to machine1, machine2, and machine3
and of course you can use regular expression in pathnames, something like /usr/lib/*

By default, rdist copies the files and directories listed in pathnames to the equivalent paths on each destination machine. You can modify this behavior by supplying a sequence of commands and terminating each with a semicolon.

The commands are:
notify namelist;
except pathlist;
except_pat patternlist;
special [pathlist] string;
cmdspecial [pathlist] string;


The “notify” command takes a list of email addresses as its argument. So, when a file is updated, it sends an email to the defined list of emails. If you don’t add a complete email address, like someone@someone.com, it will add the name of destination host as suffix. So, if you just enter Khosro, for example, it will add Khosro@machine1.localdomain to it.

The “except” and “except_pat” commands are used to except pathnames from the list of files to be copied. You can define pattern or regular expression in “except_pat” command as well. Therefore,
except /root/test.txt ;” command don’t copy test.txt file to clients.

The “special” command executes a shell command on each remote host. If there is a pathlist, the rdist executes the command once after copying each of specified files. For example,
special /root/test.txt “echo 1 > test2.txt” ;
does nothing when it copies the /etc/group, but it runs “echo 1 > test2.txt command when it copies /root/test.txt
If you don’t specify a pathlist, rdist executes the command after copying every file. For instance,
special  “echo 1 > test2.txt” ;
copies /etc/group, then runs “echo 1 > test2.txt”. and again, copies /root/test.txt and then runs “echo 1 > test2.txt” 

cmdspecial” is the same as “special”, however, it executes the shell command once after all copying is complete. So, in our example, it copies the /root/test.txt and /etc/group first, and then runs “echo 1 > test2.txt” command.

The following shows how to run rdist command through ssh tunnel:
rdist -P /usr/bin/ssh -f distfile

Now, let's see some examples:  

Scenario 1:
If you want to run a shell command after copying the second file, you need a distfile like Figure 2:
 
                                                                   Figure 2

Figure 3 shows the notification email. It has been sent to user Khosro:

                                                                    Figure 3

And Figure 4 shows the copied files in destination:

                                                                     Figure 4 

Scenario 2:
If you want to execute a shell command after copying every file, you just need to remove the pathlist in "special" command (Figure 5)

                                                                      Figure 5

Scenario 3:
If you want to run a shell command once after all copying is complete, you need to use "cmdspecial" command (Figure 6)

                                                                   Figure 6

Scenario 4:
If you want to except a file, you need to use "except" command in distfile (Figure 7)


                                                                  Figure 7


And That's all. Hope you enjoyed.
Khosro Taraghi

Saturday, May 25, 2013

What is GIT? How GIT works in Linux?

Hello everybody,
Today, I would like to talk about Revision Control. What is Revision Control and how we can configure it in Linux. Well, when you want to keep track of your changes in configuration files, source code files (like your programming codes), or any files, you need to use Revision Control. So, if your changes in the files cause any problem or for whatever reason you want to roll back, you can easily do it with Revision Control. Also, you have a history of all changes in your files. There are so many Revision Control tools, but I would like to explain about GIT. I discuss some common ways of managing changes at level of individual files by GIT.

Although you are able to create a central repository on the network, I am going to create a local repository by GIT since it's much faster and easier for our purpose here. In order to intsall GIT, run the following command:
yum install git

Before you start using GIT, set your name and email address because committers have to commit their changes as root.Names and email addresses apply to log entries even though you are running as root.

git config --global user.name "Khosro Taraghi"
git config --global user.email "root@localhost.localdomain"


                                                                    Figure 1

Now, let's create a directory and some subdirectories/files, then create a repository to cover that directory:

mkdir /report
mkdir /report/dir1
mkdir /report/dir2
touch /report/file1.txt
touch /report/file2.txt
touch /report/file3.txt
touch /report/dir1/file4.txt
touch /report/dir2/file5.txt


Run the following commands to create the repository's infrastructure in the /report/.git

cd /report
git init


                                                                          Figure 2

The following command puts everything under /report directory to Git's staging area or list. It means that it's the list of files needed to commit:

git add .

The following command commits those files. The -m flag is used to include the log message:

git commit -m "My first Commit"

                                                                           Figure 3

Now, let's test this out. I am going to make a change in file1.txt and file4.txt. Then, check them in to the repository:

echo "This is a test1" > file1.txt
echo "This is a test2" > dir1/file4.txt
git commit file1.txt -m "My first change in file1.txt"


                                                                         Figure 4

Note:
when you name or specify the name of file in the commit command (like above), the reset of changed files are not committed to repository. So, in this case, file4.txt was not committed. When multiple files involve to commit, you can use the following command: (let's change one more file, then commit all of them)

echo "This is a test3" > file2.txt
git commit -a

If you don't use the -m flag, Git will open the editor to add your log message(figure 6). If you ignore to add a message, commit will be aborted.

                                                                           Figure 5


                                                                            Figure 6

There are 2 drawbacks using "git commit -a" command:
1. "git commit -a" command doesn't pick up the new files. So, if you add a new file under /report directory, "git commit -a" doesn't add the new file to the repository.
2. Some files are system files, like /etc/mtab, and they change by system. Therefore, if you use "git commit -a" command, you may commit other unwanted files to repository which is not good.

To avoid this situation, you can use the "git status" command before committing the files:

echo "This is a test4" > file3.txt
git status

                                                                           Figure 7

To see the actual changes in the file, you can use "git diff" command:

echo "This is a test4" > file1.txt
git diff file1.txt

                                                                              Figure 8

If you want that Git ignores some specific files, first you must delete the file from current repository:

git rm --cached file3.txt

NOTE: The cached option prevents Git from actually deleting the file.
Second, you must create a ".gitignore" file and add it the list files that Git needs to ignore


                                                                              Figure 9

In short, GIT is very useful tools to keep track of your changes in files, especially configuration files and it's not more painful than making manual backup copies. And that's it. Hope you enjoyed.
Khosro Taraghi


Monday, April 22, 2013

Linux RAID (RedHat,CentOS,Fedora,SELinux)

Hi Everyone,
Today, I am going to explain that how you can create a software RAID in Linux (RedHat families). In this case, I am creating a RAID-5 with 3 disks and each disk has only 1 Giga bytes capacity. As you probably know, for RAID-5, we need at least 3 disks with the same size. So, RAID-5 writes data blocks to N-1 disks, in this case 2, and parity blocks to N disk which is 3 in this case. This means that we have 2 Giga bytes to use and RAID-5 always uses one disk for parity. And you may say that we are wasting 1 Giga bytes or 1 disk here, however you protect the system against the failure of one disk. Therefore, if one disk fails, you can replace it easily by another disk without being worry about losing data. Of course, RAID-5 has its own advantages and disadvantages but it is not related to this topic now.

So, I added 3 new raw disks. I can confirm that by running the fdisk -l command (Figure 1).

                                                                                Figure 1

The md command (Multiple Disks)is used to create a software RAID. The following command builds a RAID-5 array from my 3 disks (Figure 2) and activates it:

mdadm --create /dev/md0 --level=5 --raid-devices=3 /dev/sdb /dev/sdc /dev/sdd

                                                                               Figure 2

/proc/mdstat contains a summary of RAID/Array status. Run the following command:
cat /proc/mdstat (Figure 3)


                                                                             Figure 3

Also, take a look at the /var/log/messages file (Figure 4):

                                                                     Figure 4

Now, we need to dump the current RAID setup into a configuration file. Then, the configuration file can be read at startup or shutdown to esaily manage the array. Run the following commands (Figure 5):

echo "DEVICE /dev/sdb /dev/sdc /dev/sdd" > /etc/mdadm.conf
mdadm --detail --scan >> /etc/mdadm.conf


                                                                     Figure 5

The following command enables array to read the /etc/mdadm.conf file at startup:
mdadm -As /dev/md0

To stop the array manually, run the following command:
mdadm -S /dev/md0

To monitor our array and send notifications for any problems by email, add a MAILADDR line to the /etc/mdadm.conf. Then, start the service (Figure 6):

echo "MAILADDR root@localhost.localdomain" >> /etc/mdadm.conf
service mdmonitor start


To start mdmonitor at boot time, run the following command:
chkconfig mdmonitor on


                                                                        Figure 6

To simulate a failed disk, run the following command and then read the email notifications (Figure 7,8):
mdadm /dev/md0 -f /dev/sdc

Figure 7

Figure 8

Also, take a look at /var/log/messages file (Figure 9):

                                                                         Figure 9

To remove the disk from array and array configuration, run the following command (Figure 10):
mdadm /dev/md0 -r /dev/sdc

Now, replace the disk (if it supports Hot-swap drive hardware, otherwise turn off system) and run the following command to add the disk back to array (Figure 10):

mdadm /dev/md0 -a /dev/sdc

Take a look at the log file again (Figure 10):

                                                                         Figure 10

In order to use this RAID5 array, we need to format it and then mount it. Afterward, use df -h command to verify it (Figure 11):

                                                                             Figure 11

To mount the array at boot time, edit /etc/fstab and add the following line (Figure 12):
/dev/md0    /media/RAID5    ext4    defaults    0 0

                                                                          Figure 12

And that's all.
Hope you enjoyed.
Khosro Taraghi

Sunday, March 31, 2013

tcpdump (Packet Sniffer)

Hello Everybody,
Today, I want to talk about very interesting tools called Tcpdump. Tcpdump is a packet sniffer like Wiresharck. It listenes to network traffic and record or print packets that meet your criteria of your choice.

Tcpdump is good for troubleshooting your network. For example, when you don't know what is the issue in your network or you know the issue but you want to discover the root of problem, Tcpdump can help you to solve these kind of issues.Tcpdump is also good for security purposes. For instance, you can find the source ip address of attackers to your network.

Tcpdump is installed in Linux by default. If not, you can install it by the following command:

yum install tcpdump

Tcpdump adjusts on the first network interface by default, for example eth0. However, you can change it the interface with -i flag.

tcpdump -i eth1

You can skip name lookups with tcpdump using -n flag. For instance, when the DNS is broken, you can use the following command:

tcpdump -n

The -v flag produces verbose output such as time to live, identification, total length and options in an IP paket. The -vv flag produces even more verbose output.

You can filter the packets by specific machine or network. For example, the following command filters the packets by source ip address:

tcpdump host 192.168.2.12

                                                                    Figure 1

                                                                  Figure 2

You can dump the output to a file for later use/review with -w flag. Note that tcpdump -w saves only packet headers by default. Use the -s option with a value of 1560 (MTU size) to capture whole packets.

                                                                  Figure 3

                                                                  Figure 4

Note:
You can't use cat command or other editors to look at the captured output file by above command. Look at the following picture (Figure 5).


                                                                    Figure 5

Instead, use the -r flag to see the output:
tcpdump -r name-of-file

                                                                   Figure 6

If you look at the above picture, the fist packet shows 192.168.2.12 with port number of 49025 sending a dns lookup request about mytestmachine.localhost to R1J. Since the server port number (53) is well known, tcpdump shows its symbolic name, Domain.

17:42:07.993359 IP 192.168.2.12.49025 > R1J.domain: 2821+ A? mytestmachine.localhost. (41)

In short, tcpdump is a tool known as packet sniffers. It listens to network traffic and record or print packets that meet your criteria of your choice in human-readable form.

Hope you enjoyed.
Khosro Tataghi