Friday, November 29, 2013

What Is Systemd and How It Works (Part 1)


systemd is a system and service manager and recent Fedora is using systemd (Fedora 18 and above, I think). System startup is managed by systemd now and all original System V (init system for starting individual services) and Upstart service has been deprecated and phased out.

The old System V was using different scripts(daemons) sequentially in different runlevels. For example, System V starts ssh service in runlevel 5 after firewall and network service because ssh service depends on network service. This sequentially running of services make a slow startup and that’s why System V has been phased out.

The new Systemd starts daemons at same time and this parallel running of daemons means a very fast startup. How come? Well, systemd uses sockets for all services. It sets up sockets for daemons and coordinates between them as they start up. So, when a daemon requires support from another daemon, systemd coordinate the data from their sockets . For example, daemon A starts and it needs a support from daemon B, however, daemon B has not started yet . Therefore, systemd writes daemon A’s request to daemon B’s socket(buffering) and it continues. So daemon A doesn’t need to wait for daemon B. As soon as daemon B starts, it will read its socket. This means parallel processing and system boots very fast. The socket activation was designed by Apple’s OS X system.

systemd is compatible with System V and actually systemd uses System V’s configurations and scripts as additional information files. If there is no any configuration file for systemd already, systemd will use System V scripts and configuration files to generate a corresponding configuration files. However, systemd configuration files always take precedence. For example, systemd uses /etc/fstab to generate corresponding systemd configuration file system or looks at /etc/rc.d directory to finds start and stop files and determines dependencies.

Configuration for systemd tasks are defined in unit files. Therefore, systemd defines different units files for different tasks and each unit file has its own configuration file. Unit files are divided to the following categories:

service 
target 
socket 
device 
mount 
automount 
path 
snapshot 
swap 
timer

So, those unit files that are related to “service” have “.service” extension or unit files related to “mount” have “.mount” extension and so forth. An good example can be boot.mount or smb.service.

Now, inside each unit file, there are directives and configuration options. Some of these directives and options are common to all units and you can find it in systemd.unit man page.

man systemd.unit

According to man page, this man page(systemd.unit) lists the common configuration options of all the unit types. These options need to be configured in the [Unit] or [Install] sections of the unit files.

In addition, you can find a list of configuration options shared by services, sockets, mount and swap unit types in systemd.exec man page:

man systemd.exec

The execution specific configuration options are configured in the [Service], [Socket], [Mount], or [Swap] sections in the unit files, depending on the unit type.

Unit file syntax


Well, a very comprehensive explanation exist in man page (man systemd.unit) for your reference. Here is a short, still very useful, explanation of [Unit] section in each unit files. Remember this part is common to all of them. Some common options under [Unit] section are:

[Unit]
Description= A descriptive information along with the unit name 
Documentation= A list of man pages referencing for this unit or its configuration 
Requires= According to man page, this configures requirement dependencies on other units. If this unit gets activated, the units listed here will be activated as well. If one of the other units gets deactivated or its activation fails, this unit will be deactivated. Note that requirement dependencies do not influence the order in which services are started or stopped. This has to be configured independently with the After= or Before= options. 
Wants= A weaker version of Requires=. A unit listed in this option will be started if the configuring unit is. However, if the listed unit fails to start up or cannot be added to the transaction this has no impact on the validity of the transaction as a whole. 
Conflicts= Configures negative requirement dependencies. If a unit has a Conflicts= setting on another unit, starting the former will stop the latter and vice versa.  
Before= Configures ordering dependencies between units. If a unit foo.service contains a setting “Before=bar.service” and both units are being started, bar.service's start-up is delayed until foo.service is started up.  
After= It is the inverse of “Before=”  
AllowIsolate= If true this unit may be used with the “systemctl isolate” command. Otherwise this will be refused.  
ConditionPathExists= a file existence condition is checked before a unit is started. If the specified absolute path name does not exist the condition will fail  
ConditionPathIsDirectory= is similar to ConditionPathExists= but verifies whether a certain path exists and is a directory

 
Some common options under [Install] section are:

 
[Install]  
Alias=Additional names this unit shall be installed under. The names listed here must have the same suffix (i.e. type) as the unit file name.  
Also= Additional units to install/deinstall when this unit is installed/deinstalled  
WantedBy=, RequiredBy=  This option creates a symbolic link to the unit in a “.wants” subdirectory for the WantedBy unit. For example, assume the you enabled the rsyslog service. “WantedBy=multi-user.target” directive in syslog.service unit file creates a symbolic link in /etc/systemd/system/multi-user.target.wants/rsyslog.service to the actual rsyslog.service. Then, this unit file (rsyslog.service) is wanted/needed by multi-user.target unit file. In other words, all units that multi-user.target wants it would be in multi-user.target.wants directory. As you can see here, all WantsBy symbolic links are setup in the /etc/systemd/system directory. These symbolic links can be changed as you enable/disable a service. if you disable a service, it will remove the link.RequiredBy is a much stronger dependency.

                                                                            Figure 1

Also, as I mentioned above, there are some configuration options shared by these four units as well: services, sockets, mount and swap (man systemd.exec). The execution specific configuration options are configured in the [Service], [Socket], [Mount], or [Swap] sections, depending on the unit type. Let’s take a look:

WorkingDirectory= Takes an absolute directory path. Sets the working directory for executed processes.  
RootDirectory= Takes an absolute directory path. Sets the root directory for executed processes, with the chroot system call.  
User=, Group= Sets the Unix user or group that the processes are executed as, respectively.  
Nice= Sets the default nice level (scheduling priority) for executed processes. CPUSchedulingPriority= Sets the CPU scheduling priority for executed processes.  
UMask= Controls the file mode creation mask. Default is 022.  
Environment= Sets environment variables for executed processes. Takes a space-separated list of variable assignments.  
EnvironmentFile= Similar to Environment= but reads the environment variables from a text file. The text file should contain new-line separated variable assignments. Empty lines and lines starting with ; or # will be ignored, which may be used for commenting. The argument passed should be an absolute file name or wildcard expression, optionally prefixed with "-", which indicates that if the file does not exist it won't be read and no error or warning message is logged.  
StandardOutput= Set output to a log, console, or null.  
SyslogFacility= Sets the syslog facility to use when logging to syslog. One of kern, user, mail, daemon, auth, syslog, lpr, news, uucp, cron, authpriv, ftp, local0, local1, local2, local3, local4, local5, local6 or local7.  
SyslogLevel= Default syslog level to use when logging to syslog or the kernel log buffer. One of emerg, alert, crit, err, warning, notice, info, debug.  
MemoryLimit= Limit the overall memory usage of the executed processes to a certain size. DeviceAllow=, DeviceDeny= Control access to specific device nodes by the executed processes. 

Now, let’s take a look at some examples.

                                                                           Figure 2

Don’t worry about [service] section on this example now. I will explain specific configuration options in the [Service], [Socket], [Mount], and [Swap] sections in part 2.

Another example:

                                                                              Figure 3

and

                                                                             Figure 4

and pretty much that’s it. I will explain the rest options and commands in part 2. Don’t forget to follow it. Hope you enjoyed. 

Khosro Taraghi

Monday, October 28, 2013

What Is FirewallD and How It Works (firewall-cmd)

Hello everyone,
Today, I would like to talk about new implemented firewall in Fedora (18 and above, I guess) which is called FirewallD or Dynamic Firewall. FirewallD is more powerful and flexible compared to old static firewall. In static firewall, you list a set of rules and then firewall reads them by restarting your firewall, however, in new FirewallD you apply modified rules without restarting firewall. In fact, FirewallD does not use netfilter rules in the traditional sense. In other words, you cannot use the iptables command to add firewall rules for the Firewalld daemon. They conflict with each other. And, of course you can use the old iptables firewall, however, you have to first disable FirewallD which is not a good idea in my opinion.

You can use either firewall-config tool (GUI version) or firewall-cmd command (command line version) to set up your firewall. Systemd manages FirewallD by using firewalld.service unit file. If you don't know what are systemd and unit files, take a look at these links:  http://linuxconfau.blip.tv/file/4696791/  and http://fedoraproject.org/wiki/Systemd
Let's take a look at inside firewalld.service Figure 1. I tried to put all explanations inside Figure 1.


                                                                               Figure 1

By the way, D-Bus is a free and open-source inter-process communication system, allowing multiple, concurrently-running computer programs (processes) to communicate with one another.

FirewallD uses zones. A network zone defines the level of trust for network connections. Most zones are mutable, but there are also immutable zones. Immutable zones are not customizable and there is no way to overload them. These are the different zones:

Zone                                    Description
-----------------------------------------------------
drop (immutable)                 Deny all incoming connections, outgoing ones are accepted.
block (immutable)                Deny all incoming connections, with ICMP host prohibited messages issued.
trusted (immutable)              Allow all network connections
public                                  Public areas, do not trust other computers
external                               For computers with masquerading enabled, protecting a local network
dmz                                     For computers publicly accessible with restricted access. 
work                                    For trusted work areas
home                                   For trusted home network connections
internal                                For internal network, restrict incoming connections

Default zone is defined in /etc/firewalld/firewalld.conf. Figure 2.
Location of default and fallback zone files (in xml format) are in /usr/lib/firewalld/zones Figure 2.
Zone configurations are located in /etc/firewalld/zones.

                                                                              Figure 2

firewall-cmd

firewall-cmd is a command line to set your firewall with so many options. There are two options to save your changes. One is Permanent and the other one is runtime. Runtime changes are deleted after reload or restart. Permanent option will be there even after reload/restart/reboot.

Now, let's try few examples (Figure 3):

firewall-cmd --get-zones --> List your zones
firewall-cmd --get-services --> List all supported zones under the current zone
firewall-cmd --get-icmptype --> List icmp types
firewall-cmd --get-default-zone --> List default zone
firewall-cmd --set-default-zone=zone --> To set your default zone
firewall-cmd --get-active-zones --> Print currently active zones
firewall-cmd --get-zone-of-interface=interface --> Print the name of the zone the interface is bound to or no zone.
firewall-cmd --list-all-zones --> List everything added for or enabled in all zones.


                                                                              Figure 3

firewall-cmd --zone=public --list-all  --> List everything added for or enabled in public zone
firewall-cmd --zone=public --query-interface=ens33
firewall-cmd --zone=dmz --query-interface=ens33
firewall-cmd [--permanent] --add-service postgresql  --> To add services to the zone
firewall-cmd --query-service=postgresql --> To check if the service is enabled for a zone
or
cat /etc/services | grep postgresql
iptables-save | grep 5432


                                                                          Figure 4

firewall-cmd --remove-service postgresql --> To remove services from the zone
firewall-cmd --zone=dmz --add-port=22/tcp --> To add ssh port 22
firewall-cmd --zone=dmz --query-port=22/tcp --> To query the added port 22
firewall-cmd --zone=dmz --remove-port=22/tcp --> To remove port 22 in dmz zone
firewall-cmd --zone=dmz --add-masquerade --timeout=30 --> Enable IPv4 masquerade for zone. If zone is omitted, default zone will be used. If a timeout is supplied, masquerading will be active for the amount of seconds.


                                                                          Figure 5

If you want to use custom rules, you can use --direct option. The direct options give a more direct access to the firewall.

Note:
Direct options should be used only as a last resort when it's not possible to use for example --add-service=service.

firewall-cmd --direct --get-chains ipv4 filter -->  Get all chains added to table filter, in this case, as a space separated list. This option concerns only chains previously added with --direct 

firewall-cmd --direct --get-rules ipv4 filter INPUT  --> Get all rules added to chain INPUT in table filter as a newline separated list of the priority and arguments.

firewall-cmd --direct --add-rule ipv4 filter INPUT 0 -p tcp --dport 22 -j ACCEPT   --> Add a rule with the arguments args to chain INPUT in table filter with priority 0. The priority is used to order rules. Priority 0 means add rule on top of the chain, with a higher priority the rule will be added further down. Rules with the same priority are on the same level and the order of these rules is not fixed and may change. If you want to make sure that a rule will be added after another one, use a low priority for the first and a higher for the following.

firewall-cmd --direct --get-rules ipv4 filter INPUT
firewall-cmd --direct --remove-rule ipv4 filter INPUT 0 -p tcp --dport 22 -j ACCEPT --> to remove rule
firewall-cmd --direct --get-rules ipv4 filter INPUT

                                                                           Figure 6

If you want a comprehensive list of options, please refer to man page. I read Ferdora 19's man page and it's much nicer than before in terms of explanation. And that's all. Hope you enjoyed.
Khosro Taraghi

Wednesday, September 25, 2013

Database Maintenance For PostgreSQL & VACUUM Command

Hello everyone,
Today, I would like to talk about database maintenance for PostgreSQL. In my previous blog, I explained that how we can install PostgreSQL. The best tool to use for physical maintenance which is related to disk usage, and analytical maintenance which is related to increasing performance, is VACUUM SQL command or its equivalent command-line vacuumdb. This command removes all temporary data that other processes may leave and any leftover data from rollbacks. That's why it's a good tool for disk usage. Also, it analyses data and activities in database to improve performance, especially when you want to update/add/delete a large number of data in database.That's why it's a good tool for increasing performance too.

NOTE:
Be aware that vacuum command will pause any query on the table that vacuum command is running until it completes its job on that table. Therefore, it's a good idea to run this tool at midnight when there is no or less database activities or during maintenance window when there is no any connection to database.

VACUUM SQL Syntax:


vacuum [Full] [verbose] [analyze] [table [(column,...)]];

vacuum command without any keywords will be run on all tables in connected database. If you want to run vacuum on a specific table or even on a specific column, you can use table/column keywords.

"analyze" keyword is used for query optimizer and it examines the allocation of data on each table/s and column/s.
Let's see an example. Figure 1 and 2 show the usage of vacuum sql statement with different keywords. I connect to "library" database and going to work with either all tables or only "books" table:

                                                                           Figure 1

                                                                             Figure 2


VACUUMDB Command Line Syntax:


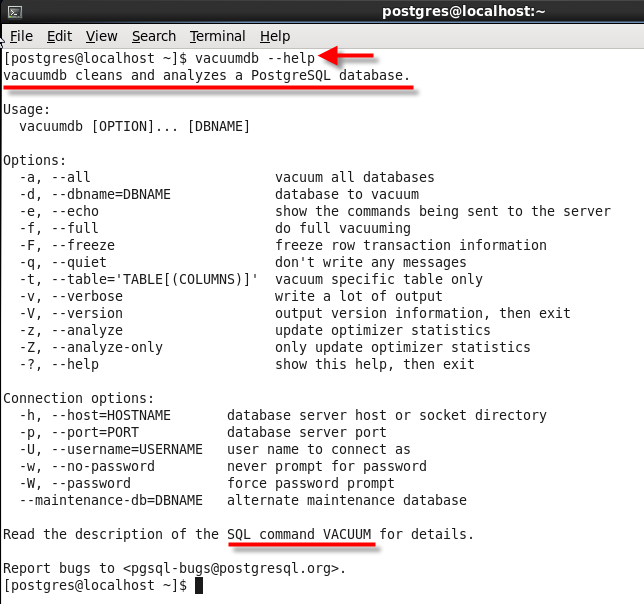
We can do the same thing in command line with more options and flexibilities. Figure 3 shows all options and syntax with this command:

                                                                              Figure 3

It's pretty much self-explanatory. So, let's try some examples: (Figure 4)

                                                                              Figure 4

With PostgreSQL command-line, we can write a script and schedule it to run at midnight with cron command. It runs at 3 AM every night. Figure 5 and 6:


                                                                               Figure 5

                                                                              Figure 6

and here is the output (Figure 7):

                                                                            Figure 7

Hope you enjoyed.
Khosro Taraghi