Saturday, May 25, 2013

What is GIT? How GIT works in Linux?

Hello everybody,
Today, I would like to talk about Revision Control. What is Revision Control and how we can configure it in Linux. Well, when you want to keep track of your changes in configuration files, source code files (like your programming codes), or any files, you need to use Revision Control. So, if your changes in the files cause any problem or for whatever reason you want to roll back, you can easily do it with Revision Control. Also, you have a history of all changes in your files. There are so many Revision Control tools, but I would like to explain about GIT. I discuss some common ways of managing changes at level of individual files by GIT.

Although you are able to create a central repository on the network, I am going to create a local repository by GIT since it's much faster and easier for our purpose here. In order to intsall GIT, run the following command:
yum install git

Before you start using GIT, set your name and email address because committers have to commit their changes as root.Names and email addresses apply to log entries even though you are running as root.

git config --global user.name "Khosro Taraghi"
git config --global user.email "root@localhost.localdomain"


                                                                    Figure 1

Now, let's create a directory and some subdirectories/files, then create a repository to cover that directory:

mkdir /report
mkdir /report/dir1
mkdir /report/dir2
touch /report/file1.txt
touch /report/file2.txt
touch /report/file3.txt
touch /report/dir1/file4.txt
touch /report/dir2/file5.txt


Run the following commands to create the repository's infrastructure in the /report/.git

cd /report
git init


                                                                          Figure 2

The following command puts everything under /report directory to Git's staging area or list. It means that it's the list of files needed to commit:

git add .

The following command commits those files. The -m flag is used to include the log message:

git commit -m "My first Commit"

                                                                           Figure 3

Now, let's test this out. I am going to make a change in file1.txt and file4.txt. Then, check them in to the repository:

echo "This is a test1" > file1.txt
echo "This is a test2" > dir1/file4.txt
git commit file1.txt -m "My first change in file1.txt"


                                                                         Figure 4

Note:
when you name or specify the name of file in the commit command (like above), the reset of changed files are not committed to repository. So, in this case, file4.txt was not committed. When multiple files involve to commit, you can use the following command: (let's change one more file, then commit all of them)

echo "This is a test3" > file2.txt
git commit -a

If you don't use the -m flag, Git will open the editor to add your log message(figure 6). If you ignore to add a message, commit will be aborted.

                                                                           Figure 5


                                                                            Figure 6

There are 2 drawbacks using "git commit -a" command:
1. "git commit -a" command doesn't pick up the new files. So, if you add a new file under /report directory, "git commit -a" doesn't add the new file to the repository.
2. Some files are system files, like /etc/mtab, and they change by system. Therefore, if you use "git commit -a" command, you may commit other unwanted files to repository which is not good.

To avoid this situation, you can use the "git status" command before committing the files:

echo "This is a test4" > file3.txt
git status

                                                                           Figure 7

To see the actual changes in the file, you can use "git diff" command:

echo "This is a test4" > file1.txt
git diff file1.txt

                                                                              Figure 8

If you want that Git ignores some specific files, first you must delete the file from current repository:

git rm --cached file3.txt

NOTE: The cached option prevents Git from actually deleting the file.
Second, you must create a ".gitignore" file and add it the list files that Git needs to ignore


                                                                              Figure 9

In short, GIT is very useful tools to keep track of your changes in files, especially configuration files and it's not more painful than making manual backup copies. And that's it. Hope you enjoyed.
Khosro Taraghi


Monday, April 22, 2013

Linux RAID (RedHat,CentOS,Fedora,SELinux)

Hi Everyone,
Today, I am going to explain that how you can create a software RAID in Linux (RedHat families). In this case, I am creating a RAID-5 with 3 disks and each disk has only 1 Giga bytes capacity. As you probably know, for RAID-5, we need at least 3 disks with the same size. So, RAID-5 writes data blocks to N-1 disks, in this case 2, and parity blocks to N disk which is 3 in this case. This means that we have 2 Giga bytes to use and RAID-5 always uses one disk for parity. And you may say that we are wasting 1 Giga bytes or 1 disk here, however you protect the system against the failure of one disk. Therefore, if one disk fails, you can replace it easily by another disk without being worry about losing data. Of course, RAID-5 has its own advantages and disadvantages but it is not related to this topic now.

So, I added 3 new raw disks. I can confirm that by running the fdisk -l command (Figure 1).

                                                                                Figure 1

The md command (Multiple Disks)is used to create a software RAID. The following command builds a RAID-5 array from my 3 disks (Figure 2) and activates it:

mdadm --create /dev/md0 --level=5 --raid-devices=3 /dev/sdb /dev/sdc /dev/sdd

                                                                               Figure 2

/proc/mdstat contains a summary of RAID/Array status. Run the following command:
cat /proc/mdstat (Figure 3)


                                                                             Figure 3

Also, take a look at the /var/log/messages file (Figure 4):

                                                                     Figure 4

Now, we need to dump the current RAID setup into a configuration file. Then, the configuration file can be read at startup or shutdown to esaily manage the array. Run the following commands (Figure 5):

echo "DEVICE /dev/sdb /dev/sdc /dev/sdd" > /etc/mdadm.conf
mdadm --detail --scan >> /etc/mdadm.conf


                                                                     Figure 5

The following command enables array to read the /etc/mdadm.conf file at startup:
mdadm -As /dev/md0

To stop the array manually, run the following command:
mdadm -S /dev/md0

To monitor our array and send notifications for any problems by email, add a MAILADDR line to the /etc/mdadm.conf. Then, start the service (Figure 6):

echo "MAILADDR root@localhost.localdomain" >> /etc/mdadm.conf
service mdmonitor start


To start mdmonitor at boot time, run the following command:
chkconfig mdmonitor on


                                                                        Figure 6

To simulate a failed disk, run the following command and then read the email notifications (Figure 7,8):
mdadm /dev/md0 -f /dev/sdc

Figure 7

Figure 8

Also, take a look at /var/log/messages file (Figure 9):

                                                                         Figure 9

To remove the disk from array and array configuration, run the following command (Figure 10):
mdadm /dev/md0 -r /dev/sdc

Now, replace the disk (if it supports Hot-swap drive hardware, otherwise turn off system) and run the following command to add the disk back to array (Figure 10):

mdadm /dev/md0 -a /dev/sdc

Take a look at the log file again (Figure 10):

                                                                         Figure 10

In order to use this RAID5 array, we need to format it and then mount it. Afterward, use df -h command to verify it (Figure 11):

                                                                             Figure 11

To mount the array at boot time, edit /etc/fstab and add the following line (Figure 12):
/dev/md0    /media/RAID5    ext4    defaults    0 0

                                                                          Figure 12

And that's all.
Hope you enjoyed.
Khosro Taraghi

Sunday, March 31, 2013

tcpdump (Packet Sniffer)

Hello Everybody,
Today, I want to talk about very interesting tools called Tcpdump. Tcpdump is a packet sniffer like Wiresharck. It listenes to network traffic and record or print packets that meet your criteria of your choice.

Tcpdump is good for troubleshooting your network. For example, when you don't know what is the issue in your network or you know the issue but you want to discover the root of problem, Tcpdump can help you to solve these kind of issues.Tcpdump is also good for security purposes. For instance, you can find the source ip address of attackers to your network.

Tcpdump is installed in Linux by default. If not, you can install it by the following command:

yum install tcpdump

Tcpdump adjusts on the first network interface by default, for example eth0. However, you can change it the interface with -i flag.

tcpdump -i eth1

You can skip name lookups with tcpdump using -n flag. For instance, when the DNS is broken, you can use the following command:

tcpdump -n

The -v flag produces verbose output such as time to live, identification, total length and options in an IP paket. The -vv flag produces even more verbose output.

You can filter the packets by specific machine or network. For example, the following command filters the packets by source ip address:

tcpdump host 192.168.2.12

                                                                    Figure 1

                                                                  Figure 2

You can dump the output to a file for later use/review with -w flag. Note that tcpdump -w saves only packet headers by default. Use the -s option with a value of 1560 (MTU size) to capture whole packets.

                                                                  Figure 3

                                                                  Figure 4

Note:
You can't use cat command or other editors to look at the captured output file by above command. Look at the following picture (Figure 5).


                                                                    Figure 5

Instead, use the -r flag to see the output:
tcpdump -r name-of-file

                                                                   Figure 6

If you look at the above picture, the fist packet shows 192.168.2.12 with port number of 49025 sending a dns lookup request about mytestmachine.localhost to R1J. Since the server port number (53) is well known, tcpdump shows its symbolic name, Domain.

17:42:07.993359 IP 192.168.2.12.49025 > R1J.domain: 2821+ A? mytestmachine.localhost. (41)

In short, tcpdump is a tool known as packet sniffers. It listens to network traffic and record or print packets that meet your criteria of your choice in human-readable form.

Hope you enjoyed.
Khosro Tataghi

Tuesday, February 26, 2013

OSSEC: Host-Based Intrusion Detection In Linux (RedHat Families)

Hello Everybody,
Today, I would like to talk about a very interesting tools called OSSEC. OSSEC detects intrusions and attempted intrusions and it's also hosed-based intrusion detection system(HIDS). OSSEC is a free software under the GNU General Public License and it's available for Linux, Windows, Solaris,HP-UX, and AIX.

OSSEC provides the following services:

1. Log analysis
2. Rootkit detection
3. File integrity checking
4. Policy monitoring
5. Real-time and time-based alerting
6. Active response

So, you can activate OSSEC on your servers and it will send you alerts or take a proper action according to a set of rules that you define and configure if something goes wrong since it monitors your servers. So, it's like a 24/7 body guard for your servers.

OSSEC has two important elements:
1. OSSEC Manager (Server)
2. OSSEC Agent (Client)


Ossec manager stores all data related to file integrity checking, logs, events, rules, and configuration options for entire network. The OSSEC manager connects to OSSEC agent and get alls necessary information regardless of its operation system. And, of course, all communications between servers and agents is encrypted and secure. You need to create a key for each agent on the server. I explained it below.

OSSEC Server Installation
Unfortunately, you can't install OSSEC from repository with yum command and it's not in repository yet. So, you will need to download the source code. Login to the computer that you want to install OSSEC Server and download the source code directly or use wget command:

wget http://ossec.net/files/ossec-hids-latest.tar.gz

                                                                     Figure 1

Use tar command to decompress the file:
tar -zxvf ossec-hids-latest.tar.gz

Change directory:
cd ossec-hids-*

Run install.sh script to start OSSEC installation
./install.sh


                                                                    Figure 2


Type "server" and press enter. (Figure 3)
Press Enter again to accept the default location. (Figure 3)

                                                                   Figure 3

Type "y" to accept email notifications and then enter your email address. The easiest way for test purposes is that enter you local root email address if you don't have SMTP server, in this case: root@localhost.localdomain.
Enter127.0.0.1 for the ip of your smtp server.If you have smtp server,change it accordingly(Figure 4).
Enter "y" to run integrity check deamon (Figure 4).
Enter "y" to run the rootkit detection engine (Figure 4).
Enter "y" to enable enable active response (Figure 4).
Enter "y" to enbale the firewall-drop response (Figure 4).

                                                                 Figure 4

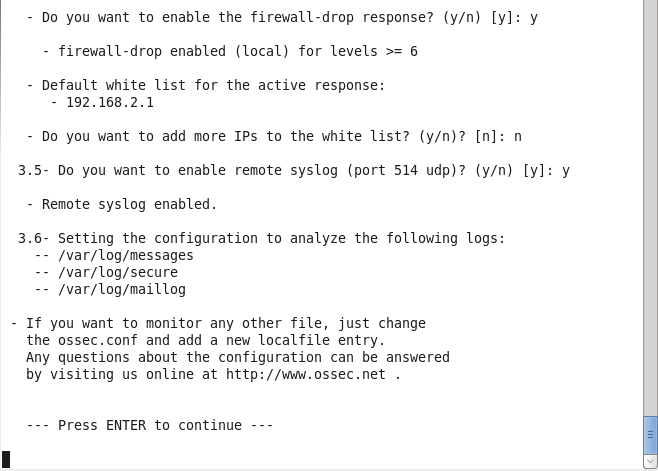
The ip of white list is up to you, in this case I entered "n" (Figure 5).
Enter "y" to enable remote syslog (Figure 5).

                                                                     Figure 5

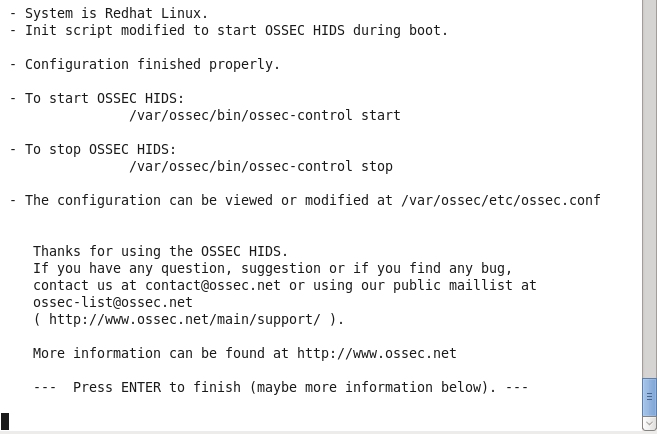
Take a look to the comments before finishing installation. It's self explanatory.


                                                                     (Figure 6)

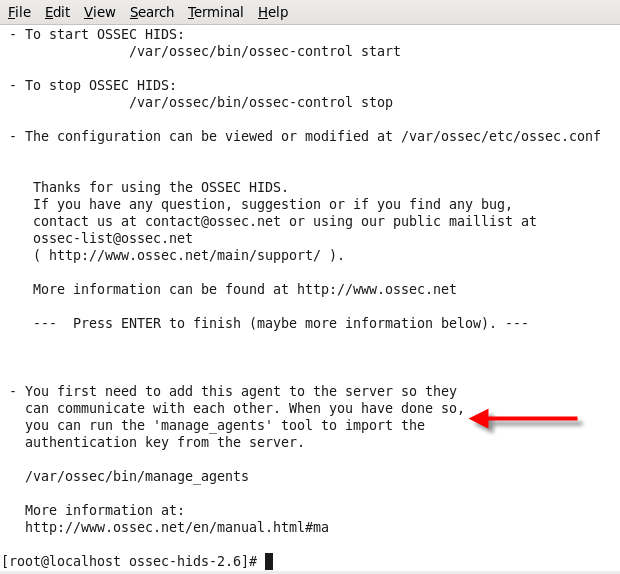
As it said in the comments (Figure 7), run /var/ossec/bin/manage_agents to add agents


                                                                     (Figure 7)

Select "A" to add an agent (Figure 8).
Type a unique name for the new agent, in this case: MyRemoteTestMachine (Figure 8).
Enter the ip address of ossec agent(client) (Figure 8).
And enter "y" to confirm adding agent (Figure 8). Pay attention to agent id of 001.

                                                                               (Figure 8)

Now, enter "E" to generate a key for agent (Figure 9).
enter agent id, in this case 001 (Figure 9).
Copy and paste or keep the generate key. We need the key later to import it in ossec agent.


                                                                                (Figure 9)


OSSEC Agent installation (Client)
Same as server, download, extract, and run installation script in the client computer (Figure 10).
This time, select "Agent" and accept the default path for installation (Figure 10).
Enter the ip of OSSEC server (Figure 10).

                                                                      Figure 10

Enter "y" for running integrity check deamon, rootkit detection engine, and avtive response (Figure 11)

                                                                      Figure 11

Take a look at comments now (Figure 12).

                                                                          Figure 12

Run /var/ossec/bin/manage_agents to import the key (Figure 13).
select "I" and paste the key here. Then confirm it (Figure 13).


Open port 1514 (UDP) if there is a firewall between the server and the agents (not applicable to the local installation type)
iptables -I INPUT -p udp --dport 1514 -j ACCEPT

After you have made this changes, restart the OSSEC agent and OSSEC server:
/var/ossec/bin/ossec-control restart


Testing OSSEC
In order to test our configured OSSEC, try to login to root with incorrect password in the client (Figure 14)
                                                                            (Figure 14)

Now, go to OSSEC server and login in as root. Then open your emails with mail command (Figure 15)
                                                                             (Figure 15)

Open your email and see notification (Figure 16)

                                                                   (Figure 16)

The majority of the configuration is stored on the server in the /var/ossec/etc/ossec.conf file.

Conclusion
OSSEC is a host-based intrusion detection system (HIDS). OSSEC is free software and is available as source code under the GNU General Public License. OSSEC runs on the systems of interest and monitors their activity. It can send alerts or take action according to a set of rules that you configure.

Hope you enjoyed.
Khosro Taraghi

Tuesday, January 29, 2013

The Samba Web Administration Tool (SWAT)

Hello everybody,
Today, I would like to talk about a very interesting tools for Samba. It's called The Samba Web Administration Tool (SWAT). Redhat families no longer use GUI tools for configuring Samba. Instead, they use a web-based administration tools for this purpose. It's really easy to use and it's fully funcational with sufficient help pages.

In order to install Samba server, Samba client, and SWAT, you need to install the following
packages:
yum install samba samba-client samba-common samba-doc samba-domainjoin-gui samba-swat

To activate SWAT, you need to start/restart xinetd service. Also, you can use chkconfig command to enable SWAT after rebooting machine:
chkconfig swat on
service xinetd start  
service xinetd restart 
  ---> if it already started

Then, you can access the SWAT by using the following url in local machine:

http://localhost:901

For sure, you can access SWAT from a remote location, but you need to open port 901 in firewall by following command: 
iptables -I INPUT -p tcp --dport 901 -j ACCEPT

Also, you must change the
only_from = 127.0.0.1
line in the /etc/xinetd.d/swat file to
only_from = ip-address-of-remote-machine
which is 192.168.2.6 in my case. Please adjust your ip address accordingly.

                                                                         Figure 1

Then restart xinetd:      service xinetd restart
In browser, when you connect to swat, it will ask you for username and password. Enter the root user account and its password, then you will see the SWAT homepage:

                                                                            Figure 2

In Homepage, you can find a very good Samba documentation.
In Global, by clicking GLOBALS icon on top Menu, you can change the global setting in the smb.conf configuration file. For example,
workgroup = MYGROUP   --> It’s set to the default workgroup for Microsoft Windows 7. If you are using workgroup in your network, you can adjust it accordingly.
or
netbios name = LOCALHOST   -->It can be the same hostname used for the system. This becomes what other clients see in network browse lists such as those shown from a Microsoft net view command or a regular Linux smbclient command.

You can always switch between Basic and Advance view of configurations. Advance view gives you sufficient details:

                                                                         Figure 3

I am not going to explain every single line in this tools since it's a lot and beyond of this discussion. I assumed that you know the Samba configuration and this topic is just to introduce SWAT. Nevertheless, I will show you how to share a folder in Samba with this tools.Also, there is always a link (Help) beside each option that gives you a lot of information.

Note: when you change something in options, you must click on Commit Changes button to save your changes. 

Note: You must open firewall for samba server. To do this, enter the following command:

iptables -I INPUT -p tcp --dport 139 -j ACCEPT
iptables -I INPUT -p tcp --dport 445 -j ACCEPT
iptables -I INPUT -p udp --dport 137 -j ACCEPT
iptables -I INPUT -p udp --dport 138 -j ACCEPT


Now, I am going to show you how to create a share folder in Samba server to be accessible by all Linux and Windows clients by using SWAT.

Make a directory that you want to share and put some dummy files in Samba server.
 
mkdir /home/khosro/Samba-Test
touch /home/khosro/Samba-Test/test.txt


In GLOBALS, change netbios name to whatever you want. In this case, KHOSROHOST. This becomes what other clients see in network browse lists.
In SHARES, enter the path to the directory that you made above. In this case: /home/khosro/Samba-Test and then click on Create Share button.

                                                                               Figure 4

Next, select the created share path in drop down menu and press Choose Share button. It will open the Basic Options view for share folder.

                                                                               Figure 5

Next, I just put my comment in Comment, my username(khosro) as valid users, change Read Only to No and Available to Yes. Then click Commit Changes.

Now, click STATUS icon on top menu and start smbd service:

                                                                         Figure 6

Next, create a samba user either by clicking PASSWORD icon or through terminal in samba server:
smbpasswd -a khosro

 
Figure 7

Click on VIEW icon to see your configurations:

                                                                         Figure 8

Now, open My Computer in Windows client and enter the samba server's ip address:
in this case: \\192.168.2.2

It prompts you for username and password. Enter your samba username and password that you created in previous step:

                                                                          Figure 9

After entering username and password, it shows you all shares:

                                                                         Figure 10

Now, if you click on share folder, you will see the following error:

                                                                         Figure 11

Because of SELinux setting, you see this error. Don't panic. You can solve this error by following command in samba server:

chcon -t samba_share_t /home/khosro
chcon -R -t samba_share_t /home/khosro/Samba-Test


In addition, to make sure the changes survive a relabel of SELinux, you’ll want to set up the file_contexts.local file in the /etc/selinux/targeted/contexts/files directory with a command such as the following:

semanage fcontext -a -t samba_share_t /home/khosro/Samba-Test 
semanage fcontext -a -t samba_share_t /home/khosro


Now, you are able to go to only /home/khosro/Samba-Test directory as a share folder and you don't have access to other folders under /home/khosro

Figure 12

By clicking the Server Status icon, you would see the current server status:

                                                                       Figure 13
And that's all. Hope you enjoyed.
Khosro Taraghi